Ok not every day or even every month but this time I have been experimenting with a lot of recipes (will get to posting them soon) but with it I have also bombed a few things :P (that isn't recently though) so I have come here with a tip of the trade.
Tip/Thought - Let batter style cooking/baking sit at least 10minutes (if folding items in, wait to add these items until after the wait time) and then give a nice good stir to the batter before pouring into baking dish/pan or adding ingredients you have to fold in (such as blue berries into blue berry muffin batter). Then bake as normal. This will allow your batter to absorb the wet ingredients rather then leave them to float to the top while baking, while the heavier ingredients sink to the bottom.
When I 'bake' things with gluten free flour whether it be cakes, breads or other sweets/savories I use to have this problem where all of my 'inside' ingredients would drop to the bottom of what ever it was I was baking before it actually baked. So instead of having this wonderful piece of cake with say blue berries going through it, all I had was this cake with a row of blueberry mush at the bottom.
I had thought about that and wondered what I could do to prevent it. Well the first thought was to go in after I had put it in the oven to bake and stir it just before it started to set but that was not a really good option as it's a good way to cause accidents.
Recently I made the most INCREDIBLE corn dogs (have recipe, have photos, will post!) and I noticed as I made them (made like 2 dozen of these things LOL) that the batter I was using started to get thicker and thicker the longer I let it sit. So my brain went into over drive.
A LONG while ago (last winter I think, might have even been the winter before) I had a craving for gold old American style corn bread. When I made it I took a recipe originally calling for some really odd amounts of wet-dry ingredients like using 3 whole eggs and 1 1/4 cups milk when your only using 2 cups dry ingredients... something else I didn't understand in this recipe was the fact that it called for over 1TBS of baking powder. So, I took the same recipe recently and made it using my editing and it came out wonderfully compared to last time. The BIGGEST thing I did to it though, was let it sit 10mins after it was mixed so it could have time to really absorb some of the wet ingredients. Then I gave it a really good stir, put it into my greased pan and baked it as normal.
Last time I made this recipe and did it as the recipe said, I ended up with a kind of corn custard style pie rather then soft moist corn muffins. All of the 'wet' stuff sank making a kind of sweet custard (recipe also called for 3/4cup sugar) and the corn/flour went to the top and actually created 2 layers to the thing. Although good in itself, it was not what I was looking for. This time it turned out perfectly though.
I'll get to posting more of the wonderful recipes I've been making and the photos to go with it!
Friday, September 26, 2008


Wednesday, September 10, 2008
Recipe - Cold Pea Salad
We had quite a warm streak here a few weeks back and I wish I had thought about this before but it's one of those dishes you really don't think of when you think 'gluten free'... specially when it comes to veggies. My mother made her attempt at a fresh cold pea salad and it was rather good but we all agreed it was lacking something. So again with thoughts in my mind, the next day I went shopping for ingredients and off I went to the kitchen to see what I could come up with. Below is what I made and it was wonderful but also made a HUGE bowl again so I would suggest for only 2 people and if you want only 1 meal or so out of it, use half the ingredients mentioned. Sorry but no photos this time... will remember next time!
1 kilo (2pounds) frozen peas
1 cup cheddar, cubed (1/2 inch works best but if you want more bite, cut them bigger)
2 medium red onions
3 large eggs, boiled
1/2 cup - 1 cup gluten free mayo
Directions
This couldn't be an easier fish except that I suggest make it the night before so that it has the night to let all the yummy flavors (like the onion) to meld.
Take the frozen peas and dump them in a strainer. Select a large bowl for mixing the salad in and then place the strainer in it. Fill the bowl with HOT water (not boiling but the hottest your tap will give you works very well). Let it sit while you prepare the rest of the ingredients.
As mentioned in the ingredients, hard boil your eggs and let cool. Finally chop your onion (this again is per taste.... if you like bigger pieces of onion don't chop it so fine... just do what you like best). When eggs are boiled and cooled, use an egg slicer and first slice them normally but then take them out carefully and turn it around and slice it the other direction as well. This will make the egg break into smaller pieces and save work for you in the end. Remember to cube that cheese too!
With all the ingredients prepared, strain peas, empty water from the bowl you are going to use for mixing and place pea without the strainer this time in the bowl :P. Place the rest of the prepared ingredients in with the peas along with the 1/2cup - 1cup mayo. Again this all depending on taste. I don't like over mayo'd items/salads so I only use 1/2 cup and it works just fine but like my father, he likes a lot of mayo so he'd probally use 1cup.
Cover and refrigerate. I suggest again over night but this mixture would be good with just a couple of hours cooling. Salad is good for about 4 to 6 days.
Cold Pea Salad
Ingredients1 kilo (2pounds) frozen peas
1 cup cheddar, cubed (1/2 inch works best but if you want more bite, cut them bigger)
2 medium red onions
3 large eggs, boiled
1/2 cup - 1 cup gluten free mayo
Directions
This couldn't be an easier fish except that I suggest make it the night before so that it has the night to let all the yummy flavors (like the onion) to meld.
Take the frozen peas and dump them in a strainer. Select a large bowl for mixing the salad in and then place the strainer in it. Fill the bowl with HOT water (not boiling but the hottest your tap will give you works very well). Let it sit while you prepare the rest of the ingredients.
As mentioned in the ingredients, hard boil your eggs and let cool. Finally chop your onion (this again is per taste.... if you like bigger pieces of onion don't chop it so fine... just do what you like best). When eggs are boiled and cooled, use an egg slicer and first slice them normally but then take them out carefully and turn it around and slice it the other direction as well. This will make the egg break into smaller pieces and save work for you in the end. Remember to cube that cheese too!
With all the ingredients prepared, strain peas, empty water from the bowl you are going to use for mixing and place pea without the strainer this time in the bowl :P. Place the rest of the prepared ingredients in with the peas along with the 1/2cup - 1cup mayo. Again this all depending on taste. I don't like over mayo'd items/salads so I only use 1/2 cup and it works just fine but like my father, he likes a lot of mayo so he'd probally use 1cup.
Cover and refrigerate. I suggest again over night but this mixture would be good with just a couple of hours cooling. Salad is good for about 4 to 6 days.
Recipe - Baked Mac and Cheese
It's been ages since I had mac and cheese of any sort. So with my husband's love of pasta with cheese sauces, I started again on another search. Mac and cheese here I come (ok there I went but still!).
This recipe is slightly altered from the one I found... well actually it's altered a lot and I found this works much better since I already had some experience in the making of cheese sauce from the potatoes earlier... I knew that straight cheddar was not going to work well in this nor was the amount of flour and such, so I already started changing it there.
The original recipe I found and went from was at Gluten Free Mom
Here is what I found worked best for me.
1 pound (16oz) uncooked gluten free elbow macaroni
2 TB butter
1/4 cup gluten free flour
2 cups milk (works well with lactose free milk)
8 oz (250grams) cheddar cheese, 1/4 inch cubed
4 oz emmental (or swiss) cheese, shredded
1/2 -3/4th cup gluten free bread crumbs
1/4th cup grated parmesan
Directions
Preheat oven to 375f or 190c and then prepare macaroni as required and then rinse well to remove extra startch. Butter a large enough baking dish that you can also put in about 3 cups of liquid and then toss in the cooked macaroni.
Mix together the gluten free bread crumbs and parmesan together and set a side.
In medium sauce pan over medium heat, melt butter. Leave heat on but remove pan for a moment. Whisk in gluten free flour and blend well. Return to heat and slow whist in milk. Bring to a very slow boil. Continue whisking entire time or you risk burning the milk to the bottom of the pan. When mixer starts to thicken, remove from heat entirely (yes turn heat off :P).
Quickly pour in emmental and whisk til melted and then add the cubes of cheddar. Mix the cheddar slightly til it starts to melt but til you can still see small pieces of it through the mixture.
Pour mixer over macaroni that you put in a baking dish earlier and give it a good mix (I sometimes depending on the amount, prefer to put macaroni in a big bowl so I can mix properly and then pour it into the baking dish). At this stage, if you you want to add cut up hotdogs or even pieces of smoke turkey/chicken pieces (lunch meat style) this is the time to do it also.
When ready to place in oven, sprinkle the bread crumb mixture over the macaroni mixture and then bake 30mins to 1 hr depending on how done and how crisp you want it.
This works well when a bit of meat is added to it as a full meal but also makes a LOT of mac and cheese. I made 3 meals (I had turkey added to it when I made it) for both my husband and I, with large portions of it even.

This recipe is slightly altered from the one I found... well actually it's altered a lot and I found this works much better since I already had some experience in the making of cheese sauce from the potatoes earlier... I knew that straight cheddar was not going to work well in this nor was the amount of flour and such, so I already started changing it there.
The original recipe I found and went from was at Gluten Free Mom
Here is what I found worked best for me.
Gluten Free Baked Mac and Cheese
Ingredients1 pound (16oz) uncooked gluten free elbow macaroni
2 TB butter
1/4 cup gluten free flour
2 cups milk (works well with lactose free milk)
8 oz (250grams) cheddar cheese, 1/4 inch cubed
4 oz emmental (or swiss) cheese, shredded
1/2 -3/4th cup gluten free bread crumbs
1/4th cup grated parmesan
Directions
Preheat oven to 375f or 190c and then prepare macaroni as required and then rinse well to remove extra startch. Butter a large enough baking dish that you can also put in about 3 cups of liquid and then toss in the cooked macaroni.
Mix together the gluten free bread crumbs and parmesan together and set a side.
In medium sauce pan over medium heat, melt butter. Leave heat on but remove pan for a moment. Whisk in gluten free flour and blend well. Return to heat and slow whist in milk. Bring to a very slow boil. Continue whisking entire time or you risk burning the milk to the bottom of the pan. When mixer starts to thicken, remove from heat entirely (yes turn heat off :P).
Quickly pour in emmental and whisk til melted and then add the cubes of cheddar. Mix the cheddar slightly til it starts to melt but til you can still see small pieces of it through the mixture.
Pour mixer over macaroni that you put in a baking dish earlier and give it a good mix (I sometimes depending on the amount, prefer to put macaroni in a big bowl so I can mix properly and then pour it into the baking dish). At this stage, if you you want to add cut up hotdogs or even pieces of smoke turkey/chicken pieces (lunch meat style) this is the time to do it also.
When ready to place in oven, sprinkle the bread crumb mixture over the macaroni mixture and then bake 30mins to 1 hr depending on how done and how crisp you want it.
This works well when a bit of meat is added to it as a full meal but also makes a LOT of mac and cheese. I made 3 meals (I had turkey added to it when I made it) for both my husband and I, with large portions of it even.

Wednesday, August 27, 2008
Recipe - Creamy Potato Au Gratin
Time to get over those sinfully delicious peanut butter cookies with something at least more nutritional :P
I actually made them last night and I'm impressed. Since I moved out here to Belgium, another thing that I started to miss was au gratin potatoes. So again wondering around looking at potato recipes, I came across a recipe and decided I had all the ingredients already so why not.
I think next time when I make the cheese sauce I shall put 1 cup cheese and 1/2 cup more milk to make it a bit thinner and a bit mellower in the salty cheese taste. But other then that, I loved the recipe and plan to make it again. Got some great photos to place with it too!
1/4 cup GF flour
2 TBS butter
2 cups low fat milk (can use whole milk if you want this recipe even creamier)
1 1/2 cups shredded cheddar cheese
Ingredients For Main Dish
2 pounds potatoes (what ever ones you prefer)
1 recipe hot cheddar cheese sauce (recipe will follow)
1/2 cup parmesan cheese - optional
1/2 cup GF bread crumbs - optional
paprika - optional
Directions For Cheese Sauce - Option #1
In medium sauce pan, melt butter. Remove from heat and whisk in flour until well combined. Stir in milk slowly while whisking to make sure it is evenly mixed and you have no clumps.
Note For Cheese Sauce If you prefer to have a thinner sauce use 2 1/2 cups milk instead of 2 cups and cut cheese to 1 cup instead of 1 1/2 cups. Follow all directions otherwise.
Return to a medium/low heat. Whisk continuously until mixer is almost boiling and has turned thick. Again, remove from heat and add shredded cheese, mix until cheese is melted through out.
Directions For Main Dish
Preheat oven to 350f or 175c. Lightly grease/butter/spray rectangular baking pan.
Peel and slice potatoes into about 1/4 inch slices. Boil potatoes on high heat for about 8minutes. This step is needed because your cheese sauce will not fully cook the potatoes until soft before the cheese sauce becomes browned and ready for serving. I usually add a chicken cube to the water as I boil potatoes for an extra flavor.
Place half the semi cooked potatoes in the prepared baking dish and cover with 1/2 the cheese sauce over them. Mix bread crumbs and parmesan cheese together if choosing to use and sprinkle half the mixture over cheese sauce.
Repeat the above process with the rest of the potatoes, cheese sauce and bread crumb mixture if using the bread crumbs. Sprinkle top with paprika if so desired but this is purely for looks and not taste.
Bake in preheated oven for about 25minutes or until dish is bubbling and has turned to the dark dish of golden brown.
This dish can sit in the still warm oven with the temperature turned off for another 30minutes if needing it to stay warm with no problems or worries.
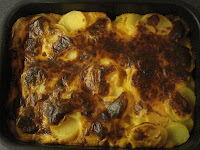


I actually made them last night and I'm impressed. Since I moved out here to Belgium, another thing that I started to miss was au gratin potatoes. So again wondering around looking at potato recipes, I came across a recipe and decided I had all the ingredients already so why not.
I think next time when I make the cheese sauce I shall put 1 cup cheese and 1/2 cup more milk to make it a bit thinner and a bit mellower in the salty cheese taste. But other then that, I loved the recipe and plan to make it again. Got some great photos to place with it too!
Creamy Potato Au Gratin
Ingredients For Cheese Sauce1/4 cup GF flour
2 TBS butter
2 cups low fat milk (can use whole milk if you want this recipe even creamier)
1 1/2 cups shredded cheddar cheese
Ingredients For Main Dish
2 pounds potatoes (what ever ones you prefer)
1 recipe hot cheddar cheese sauce (recipe will follow)
1/2 cup parmesan cheese - optional
1/2 cup GF bread crumbs - optional
paprika - optional
Directions For Cheese Sauce - Option #1
In medium sauce pan, melt butter. Remove from heat and whisk in flour until well combined. Stir in milk slowly while whisking to make sure it is evenly mixed and you have no clumps.
Note For Cheese Sauce If you prefer to have a thinner sauce use 2 1/2 cups milk instead of 2 cups and cut cheese to 1 cup instead of 1 1/2 cups. Follow all directions otherwise.
Return to a medium/low heat. Whisk continuously until mixer is almost boiling and has turned thick. Again, remove from heat and add shredded cheese, mix until cheese is melted through out.
Directions For Main Dish
Preheat oven to 350f or 175c. Lightly grease/butter/spray rectangular baking pan.
Peel and slice potatoes into about 1/4 inch slices. Boil potatoes on high heat for about 8minutes. This step is needed because your cheese sauce will not fully cook the potatoes until soft before the cheese sauce becomes browned and ready for serving. I usually add a chicken cube to the water as I boil potatoes for an extra flavor.
Place half the semi cooked potatoes in the prepared baking dish and cover with 1/2 the cheese sauce over them. Mix bread crumbs and parmesan cheese together if choosing to use and sprinkle half the mixture over cheese sauce.
Repeat the above process with the rest of the potatoes, cheese sauce and bread crumb mixture if using the bread crumbs. Sprinkle top with paprika if so desired but this is purely for looks and not taste.
Bake in preheated oven for about 25minutes or until dish is bubbling and has turned to the dark dish of golden brown.
This dish can sit in the still warm oven with the temperature turned off for another 30minutes if needing it to stay warm with no problems or worries.


Monday, August 25, 2008
Spam Messages
Ok guys and gals... this is enough. I now have changed the moderation of this blog to have to approve, reject or delete comments. Why did I have to do this?? because when I came back here to post in this group, I already had people leaving spam style comments with such stupid crap like for plasma TV's and then last night when my newest posting, I got a couple of people trying to push through dating sites.
Get real people. I wouldn't allow it on my website blogs and I'm certainly not going to allow it on my personal blog either.
Coco, I deleted the post you made before with the dating site, I'm most likely not going to approve another one so don't even try again ok?
Sorry to be this way but I want a CLEAN blog. This is MY blog to share with everyone out there that is wheat intolerant and a bbw (even if your not bbw but still love really good recipes, advice and knowledge)... but it is NOT for dropping random links off that have NOTHING to do with the topic at hand.
Get real people. I wouldn't allow it on my website blogs and I'm certainly not going to allow it on my personal blog either.
Coco, I deleted the post you made before with the dating site, I'm most likely not going to approve another one so don't even try again ok?
Sorry to be this way but I want a CLEAN blog. This is MY blog to share with everyone out there that is wheat intolerant and a bbw (even if your not bbw but still love really good recipes, advice and knowledge)... but it is NOT for dropping random links off that have NOTHING to do with the topic at hand.
Sunday, August 24, 2008
Recipe - Peanut Butter Chocolate Chip Cookies
As some of you know, one of my most favorite combos when it comes to sweets is peanut butter with chocolate! When I was still in the USA, I use to LOVE reese's peanut butter cups! Well can't even have those any more thanks to this BUT I can still make peanut butter with chocolate in other ways!
So here is another recipe that I just made this afternoon and they turned out almost better I think then any real flour cookies I could have made!
1 1/4 cup GLUTEN FREE flour mix
1 ts baking soda
1 1/2 sticks (3/4th cup) butter, softened
1 cup peanut butter (smooth or chunky doesn't matter, just what you prefer)
1/2 cup sugar
1/2 cup dark brown sugar, packed
1 large egg
1 ts vanilla (optional)
1/2 cup dark chocolate chips (semi-sweet work well but I indulged and used 70% dark chips)
Directions
Preheat oven to 350f or 175c. In large mixing bowl, cream together the peanut butter and butter with a mixer on a medium speed. When well combined, add sugars and continue to beat on medium. Keep mixing until mixture becomes light colored and fluffy. Add baking soda and egg to mixer and mix until well blended... that's it for the mixer btw ;)
When creaming process is finished, by hand mix in chocolate chips and then flour 1/3 cup or so at a time until all flour is well combined and chocolate chips are throughly mixed in.
These cookies are so good that you don't even have a reason to 'press them' like normal gluten style peanut butter cookies... they WILL spread out just as a normal 'drop' style cookie will when baking.
Drop by rounded teaspoons onto an UNGREASED cookie sheet and bake in the 350f/175c oven for 12-15mins. Then let cool about 10minutes before removing from cookie sheet to paper towels to cool before storage. You MUST wait before taking these cookies off as they are so fragile that they WILL fall into almost dust if you don't wait to move them.
Repeat with left over dough/mixture until used. I personally transfer each 'set' of cookies from their paper towel cooling to a bowl every time I take a new sheet of cookies out to cool before moving. It saves on space and paper towels.
These cookies are light and every so tasty. This is one recipe I actually like MORE this way then with gluten filled flour. It's easier to mix, make and even cook and they are so much lighter then their gluten filled counter part!


Edited Later
When making these again after I ran out of 'america' style peanutbutter, I used a version of peanutbutter I could find out here in Belgium at a lower cost then the imported american style. This was not a good choice as the ingreditents are completely different. They had no added sugar to this kind, had more added fat and a different amount of peanuts even. When making this recipe, please use the original style peanutbutter by like Jiff, Skippy and other name brands.
So here is another recipe that I just made this afternoon and they turned out almost better I think then any real flour cookies I could have made!
Peanut Butter Chocolate Chip Cookies
Ingredients1 1/4 cup GLUTEN FREE flour mix
1 ts baking soda
1 1/2 sticks (3/4th cup) butter, softened
1 cup peanut butter (smooth or chunky doesn't matter, just what you prefer)
1/2 cup sugar
1/2 cup dark brown sugar, packed
1 large egg
1 ts vanilla (optional)
1/2 cup dark chocolate chips (semi-sweet work well but I indulged and used 70% dark chips)
Directions
Preheat oven to 350f or 175c. In large mixing bowl, cream together the peanut butter and butter with a mixer on a medium speed. When well combined, add sugars and continue to beat on medium. Keep mixing until mixture becomes light colored and fluffy. Add baking soda and egg to mixer and mix until well blended... that's it for the mixer btw ;)
When creaming process is finished, by hand mix in chocolate chips and then flour 1/3 cup or so at a time until all flour is well combined and chocolate chips are throughly mixed in.
These cookies are so good that you don't even have a reason to 'press them' like normal gluten style peanut butter cookies... they WILL spread out just as a normal 'drop' style cookie will when baking.
Drop by rounded teaspoons onto an UNGREASED cookie sheet and bake in the 350f/175c oven for 12-15mins. Then let cool about 10minutes before removing from cookie sheet to paper towels to cool before storage. You MUST wait before taking these cookies off as they are so fragile that they WILL fall into almost dust if you don't wait to move them.
Repeat with left over dough/mixture until used. I personally transfer each 'set' of cookies from their paper towel cooling to a bowl every time I take a new sheet of cookies out to cool before moving. It saves on space and paper towels.
These cookies are light and every so tasty. This is one recipe I actually like MORE this way then with gluten filled flour. It's easier to mix, make and even cook and they are so much lighter then their gluten filled counter part!


Edited Later
When making these again after I ran out of 'america' style peanutbutter, I used a version of peanutbutter I could find out here in Belgium at a lower cost then the imported american style. This was not a good choice as the ingreditents are completely different. They had no added sugar to this kind, had more added fat and a different amount of peanuts even. When making this recipe, please use the original style peanutbutter by like Jiff, Skippy and other name brands.
Recipe - Tuna Melts w/ Cheese
This is a very very simple recipe and I even had it today for my lunch. I've made it so many times since I went gluten free that I even didn't think about it being a GF item! Also means atm I also don't have a photo for it... sorry! When I make it again, I'll make sure to grab a photo for you! This time it's my own recipe but yea well it's still something not too original :P
1 can tuna in water
2-4 TBS mayo
1 ts dry basil
2-4 slices GLUTEN FREE bread, I use a quite dark one for this as I like the darker breads
1-2 slices of good melting cheese, I use cheddar or a good gouda style cheese
Directions
Drain the can of tuna as well as you can and flake up into a small bowl. Mix with basil and mayo... you don't want this tuna to be too heavy on the mayo as it's going to just turn very soggy in the sandwich when it fries... so be sparing but still make sure the tuna is covered.
In a frying pan big enough for 2 sandwiches at a time (if you are making 2 sandwiches at a time, I make 2 because the bread I use is much smaller then the bread that one that can eat wheat does) drizzle the pan with squeeze margarine or lightly coat with some butter and place 2 pieces of bread down into it.
On top of bread, spoon over as much of the tuna mix as you wish but in general I use 1-2TBS of the mix per sandwich as that is really all that is needed.
Place 1 slice cheese on top of tuna mix and then place the other pieces of bread on top. If using a squeeze or spray style butter/margarine, drizzle or spray the tops of the sandwiches in preparation of turning them.
Fry like you would a grilled cheese sandwich! Medium heat until you hear it sizzling away and then flip but carefully. I usually use a small knife as well when turning so that I can hold the 'top' on while flipping to ensure it doesn't fall apart or move. Then fry until sizzling again... keeping in mind you can fry these to your desire as your just looking for that wonderful golden color you would get from a yummy grilled cheese!
That's it... be careful. If you want to eat them straight out of the frying pan, I suggest a knife and folk as the cheese WILL come out and onto your fingers... this will hurt ;) Otherwise, let sit for 10mins and then enjoy... still warm but then finger food.
Edited Later
As promised here are photos. This time I managed to get 'between' shots of this item. I will try to do this more but sometimes it's not possible depending how 'messy' the recipe is.
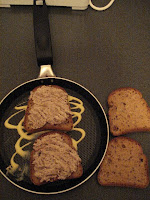


Tune Melts w/ Cheese
Ingredients1 can tuna in water
2-4 TBS mayo
1 ts dry basil
2-4 slices GLUTEN FREE bread, I use a quite dark one for this as I like the darker breads
1-2 slices of good melting cheese, I use cheddar or a good gouda style cheese
Directions
Drain the can of tuna as well as you can and flake up into a small bowl. Mix with basil and mayo... you don't want this tuna to be too heavy on the mayo as it's going to just turn very soggy in the sandwich when it fries... so be sparing but still make sure the tuna is covered.
In a frying pan big enough for 2 sandwiches at a time (if you are making 2 sandwiches at a time, I make 2 because the bread I use is much smaller then the bread that one that can eat wheat does) drizzle the pan with squeeze margarine or lightly coat with some butter and place 2 pieces of bread down into it.
On top of bread, spoon over as much of the tuna mix as you wish but in general I use 1-2TBS of the mix per sandwich as that is really all that is needed.
Place 1 slice cheese on top of tuna mix and then place the other pieces of bread on top. If using a squeeze or spray style butter/margarine, drizzle or spray the tops of the sandwiches in preparation of turning them.
Fry like you would a grilled cheese sandwich! Medium heat until you hear it sizzling away and then flip but carefully. I usually use a small knife as well when turning so that I can hold the 'top' on while flipping to ensure it doesn't fall apart or move. Then fry until sizzling again... keeping in mind you can fry these to your desire as your just looking for that wonderful golden color you would get from a yummy grilled cheese!
That's it... be careful. If you want to eat them straight out of the frying pan, I suggest a knife and folk as the cheese WILL come out and onto your fingers... this will hurt ;) Otherwise, let sit for 10mins and then enjoy... still warm but then finger food.
Edited Later
As promised here are photos. This time I managed to get 'between' shots of this item. I will try to do this more but sometimes it's not possible depending how 'messy' the recipe is.


Subscribe to:
Posts (Atom)
